Balancing speed and print quality is one of the most important challenges in 3D printing, especially when using slicer software like Creality Print. Whether you are printing prototypes quickly or producing detailed models, the right configuration can make a huge difference in results. Understanding how to adjust creality print advanced settings helps you gain control over print time, surface finish, and structural strength.
Instead of relying on default profiles, learning how each setting affects the printing process allows you to optimize for your specific project needs. In this guide, we will explore the most important adjustments inside Creality Print that help you achieve the perfect balance between speed and quality.
Understanding Creality Print Advanced Settings for Speed vs Quality Balance
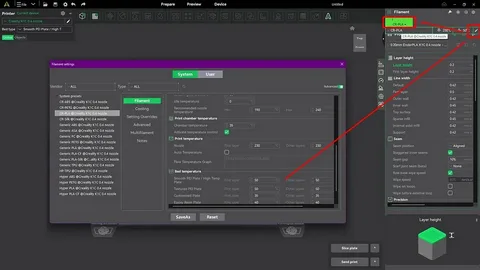
The creality print advanced settings interface gives users access to deeper slicing controls that go beyond basic presets. These settings allow you to fine-tune how the printer behaves during layer generation, extrusion, and movement, directly impacting both speed and print quality.
When optimizing for speed, the goal is to reduce unnecessary movements, increase layer heights, and lower print density. However, when focusing on quality, finer layers, slower speeds, and more detailed extrusion control are required. Understanding the trade-offs in these settings is essential before making adjustments.
Another important aspect is that every model behaves differently depending on geometry and material. A fast profile may work well for simple objects but fail on complex designs. That is why mastering creality print advanced settings is essential for consistent and reliable results.
Layer Height and Print Speed Optimization
Layer height is one of the most influential factors in balancing speed and quality. Larger layer heights significantly reduce print time because fewer layers are needed to complete the object. However, this comes at the cost of visible layer lines and reduced surface smoothness.
On the other hand, smaller layer heights improve detail and produce smoother surfaces but increase print duration. Within creality print advanced settings, adjusting layer height alongside print speed ensures you can match output quality with project requirements effectively.
Print speed itself also plays a major role. Higher speeds can shorten production time but may lead to vibrations, ringing, or reduced accuracy. Slower speeds improve precision but extend printing cycles. A balanced approach often involves moderate speeds combined with optimized layer heights for best results.
Infill, Wall Thickness, and Structural Strength
Infill density determines how solid or hollow a printed object will be. Lower infill percentages reduce material usage and print time but weaken structural integrity. Higher infill improves durability but increases both time and filament consumption. Adjusting this setting in creality print advanced settings is crucial for functional parts.
Wall thickness is equally important because it defines the strength of outer layers. Thicker walls increase durability and improve surface finish, while thinner walls help reduce print time. Finding the right combination of infill and wall thickness ensures both efficiency and strength.
In many cases, users mistakenly increase infill instead of wall thickness when they need strength. However, optimizing both together provides better results without unnecessarily slowing down the print process. This balance is key for engineering-grade prints.
Temperature, Cooling, and Material Behavior
Temperature settings directly affect how filament melts and bonds between layers. Higher temperatures improve layer adhesion but may cause stringing or loss of detail. Lower temperatures enhance precision but can weaken layer bonding. Adjusting these parameters within creality print advanced settings is essential for material-specific optimization.
Cooling plays a vital role in shaping final print quality. Proper cooling helps solidify layers quickly, reducing sagging and improving overhang performance. However, excessive cooling can lead to poor layer adhesion, especially in materials like ABS or PETG.
Different materials require different temperature and cooling strategies. PLA typically benefits from strong cooling and moderate temperatures, while ABS requires higher temperatures and minimal cooling. Understanding these relationships ensures better print stability and surface finish.
Retraction, Travel Speed, and Surface Quality
Retraction settings control how filament is pulled back during non-print movements. Proper retraction reduces stringing and oozing, improving surface cleanliness. However, overly aggressive retraction can cause clogs or under-extrusion. Fine-tuning this in creality print advanced settings is essential for smooth results.
Travel speed also influences print quality by reducing the time the nozzle spends moving between sections. Faster travel speeds reduce stringing but may introduce mechanical vibrations if set too high. A balanced speed helps maintain both efficiency and precision.
Surface quality is the final result of how well all these settings work together. Retraction, travel speed, and cooling must be optimized as a system rather than individually. When properly adjusted, they produce clean, professional-quality prints with minimal defects.
Conclusion
Mastering creality print advanced settings is the key to achieving the perfect balance between speed and quality in 3D printing. Each setting—whether it is layer height, infill, temperature, or retraction—plays a critical role in shaping the final output.
By understanding how these parameters interact, you can tailor your print profiles for different needs, from fast prototypes to highly detailed models. With practice and experimentation, Creality Print becomes a powerful tool for consistent, high-quality 3D printing results.


