

Sterilization is a critical part of infection control in hospitals, dental clinics, laboratories, and surgical centres. However, completing a successful autoclave cycle is not enough. Medical instruments must remain sterile after sterilization and until the exact time they are required.
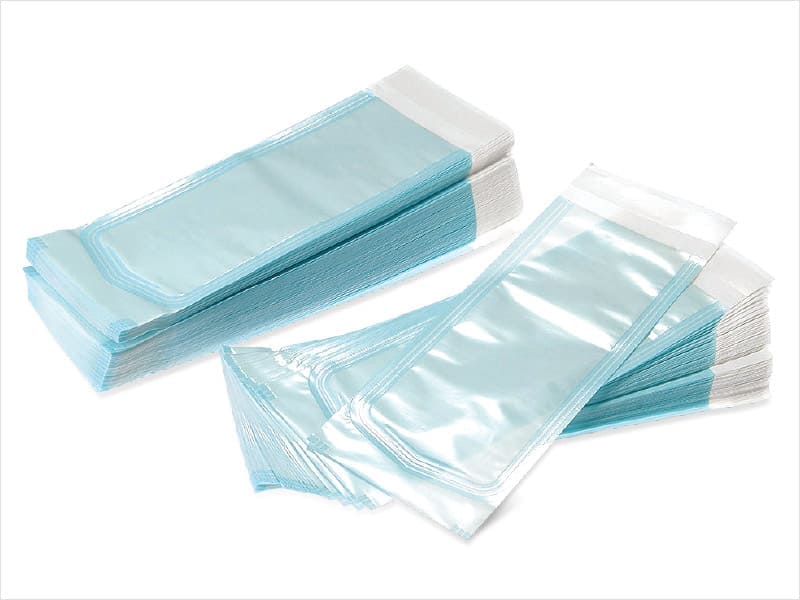
This protection is provided by Autoclave pouches. These pouches allow steam to enter during sterilization and then act as a barrier against dust, microorganisms, and handling contamination.
If an autoclave pouch is incorrectly selected, overloaded, poorly sealed, or badly stored, the sterile barrier may fail. Healthcare facilities must therefore treat sealing and storage as controlled activities, not as simple packing work.
What Are Autoclave Pouches?
Autoclave pouches are generally made from:
- Medical-grade paper on one side
- Transparent heat-resistant film on the other side
The medical paper allows steam penetration and moisture removal. The film side gives clear visibility of the instruments and helps users identify the contents without opening the package.
Autoclave pouches are available as:
- Self-seal pouches
- Heat-seal pouches
- Flat sterilization reels cut into custom lengths
The selected pouch must be clearly approved for steam sterilization at the intended temperature and cycle conditions.
1. Select the Correct Pouch Material
Material selection is the first important step.
For steam autoclaving, use medical paper and film pouches specifically designed for high-temperature steam sterilization. The paper should have:
- Controlled porosity
- Good wet strength
- Low lint generation
- Reliable microbial barrier properties
- Compatibility with the sealing film
A Tyvek pouch is commonly used for ethylene oxide and hydrogen peroxide-based low-temperature sterilization. Standard Tyvek packaging should not automatically be used in a steam autoclave. It should only be exposed to steam when the particular Tyvek grade, film combination, sealing system, and cycle have been specifically validated.
This difference is important. Using the wrong porous material may lead to deformation, poor sealing, or package failure.
2. Choose the Right Pouch Size
The pouch should comfortably hold the instrument without being too tight or excessively large.
An undersized pouch can cause:
- Stress on the seal
- Puncturing by sharp instruments
- Restricted steam circulation
- Difficulty in proper sealing
An oversized pouch can cause:
- Wrinkles in the sealing area
- Unnecessary material wastage
- Poor storage efficiency
- Difficulty in handling
Leave enough free space around the instrument and sufficient length above the seal for safe opening. Instruments should never touch or cross the sealing line.
Long instruments can be packed using flat sterilization reels cut to the correct length.
3. Clean and Dry Instruments Before Packing
Autoclaving cannot replace proper cleaning.
Before placing instruments into Autoclave pouches:
- Remove blood, tissue, oil, and other visible contamination
- Clean according to the instrument manufacturer’s instructions
- Rinse properly
- Dry completely
- Open hinged instruments such as scissors and forceps
- Inspect for rust, damage, or poor functioning
Moisture remaining on instruments may contribute to wet packs, staining, corrosion, and weakening of the medical paper.
Only clean and completely dry instruments should be packed.
4. Protect Sharp Instruments
Sharp points and cutting edges can puncture the pouch during handling, sterilization, or storage.
Use suitable:
- Tip protectors
- Instrument holders
- Backer cards
- Small trays or cassettes
The protective device should not block steam contact with the instrument.
Sharp ends should be positioned away from the pouch corners and seal area. The film and paper should not remain under constant pressure from the instrument.
5. Follow Correct Heat-Sealing Practices
Heat-seal pouches and sterilization reels should be closed using a calibrated medical heat sealer.
Three main sealing parameters must be controlled:
- Temperature
- Pressure
- Sealing time or machine speed
If the temperature is too low, the seal may be weak. If it is too high, the film may shrink, the paper may become damaged, or the seal may become difficult to peel.
Before sealing:
- Keep the sealing area clean and dry
- Remove dust, fibres, and oil
- Place the pouch straight and flat
- Avoid folds and wrinkles
- Keep the instrument away from the seal lane
The completed seal should be uniform, continuous, and of proper width. It should not contain bubbles, channels, burn marks, or unsealed sections.
6. Use Self-Seal Pouches Correctly
Self-seal Autoclave pouches contain an adhesive flap and do not require a heat sealer.
To close them correctly:
- Remove the release strip carefully
- Fold the flap exactly on the marked line
- Press firmly and evenly
- Move from the centre towards both sides
- Ensure there are no creases or trapped folds
The flap should be fully attached across the entire width. A partly closed or uneven adhesive seal can compromise sterility.
Self-seal pouches are convenient for smaller clinics, but heat-seal pouches often provide more consistent results in high-volume operations.
7. Label Without Damaging the Pouch
Each pouch should contain clear identification and traceability information, such as:
- Instrument or set name
- Sterilization date
- Load or cycle number
- Sterilizer identification
- Operator details, where required
Write only in the designated area. Avoid writing directly on the porous paper with unsuitable ink, as pressure or ink migration may weaken the material.
Labels should not:
- Cover the breathable paper
- Cross the seal area
- Hide chemical indicators
- Create folds or stiffness near the pouch edge
8. Load the Autoclave Correctly
Good sealing will not help if the autoclave is badly loaded.
Pouches should be arranged so steam can circulate freely. Avoid tight stacking and overloading the chamber.
Where suitable racks are available, place pouches on edge. Follow the sterilizer and pouch manufacturer’s instructions for orientation. Paper and film sides should not be compressed tightly against each other.
Heavy trays should not be placed on top of light pouches, as this may damage the packaging and prevent proper drying.
Always use the validated cycle for the instrument and packaging system.
9. Check Pouches After Sterilization
After the autoclave cycle, allow pouches to cool and dry before handling.
Inspect each pack for:
- Correct indicator colour change
- Dry paper and film
- Intact seals
- No holes or tears
- No delamination
- No visible moisture
- No instrument puncture
A wet pouch should be treated as compromised. Moisture can weaken medical paper and may allow microorganisms to pass through by wicking.
Do not try to repair, tape, or reseal a damaged sterilized pouch. The instrument should be cleaned, repacked in a new pouch, and sterilized again.
10. Store Autoclave Pouches Properly
Sterilized packs should be stored in a clean, dry, and protected area.
Good storage practices include:
- Use closed cabinets or covered storage
- Keep packs away from sinks and wet areas
- Protect from dust and direct sunlight
- Avoid high humidity and extreme temperatures
- Do not crush, fold, or bend pouches
- Keep heavy products away from lightweight packs
- Limit unnecessary handling
Shelves and cabinets should be cleaned regularly. Sterile packs should not be stored directly on the floor, near outside walls, or under locations where water leakage may occur.
11. Follow Event-Related Sterility
Many healthcare facilities follow event-related sterility. This means the contents remain sterile unless an event damages or compromises the package.
Such events include:
- Tearing
- Puncturing
- Wetting
- Opening
- Seal separation
- Crushing
- Heavy contamination
Every pouch should be inspected before opening. If there is any doubt about package integrity, the instrument should not be used.
12. Train Staff and Monitor the Process
Staff training is essential for consistent results.
Employees should understand:
- Pouch selection
- Instrument preparation
- Correct sealing
- Autoclave loading
- Post-cycle inspection
- Storage requirements
- Aseptic opening
Heat sealers should be maintained and calibrated regularly. Facilities should also carry out routine seal inspections and keep records of sterilization cycles.
Common Mistakes to Avoid
Common problems include:
- Overfilling the pouch
- Using a pouch unsuitable for steam
- Using a Tyvek pouch in an autoclave without validation
- Sealing over dust or wrinkles
- Handling pouches while hot or wet
- Storing sterile packs in humid areas
- Reusing single-use pouches
- Ignoring damaged seals
Preventing these mistakes helps reduce reprocessing, delays, and infection risks.
Final Thoughts
Correct use of Autoclave pouches is an important part of the sterilization process. Proper material selection, pouch sizing, instrument preparation, sealing, loading, inspection, and storage all work together to maintain sterility.
Healthcare facilities should also understand that a Tyvek pouch is mainly used for specific low-temperature sterilization methods and should not be treated as a general replacement for steam-compatible medical paper pouches.
When correct procedures are followed, autoclave pouches provide safe, reliable, and cost-effective protection from the sterilizer to the point of use.
Bottom Line
The best practices for sealing and storing Autoclave pouches include selecting steam-compatible materials, creating clean and uniform seals, avoiding overfilling, completing proper drying, and storing packs in protected conditions. Correct handling maintains sterile barrier integrity, reduces contamination risk, and supports patient safety worldwide.
A product-focused conclusion and internal-linking suggestions for sterilmedipac.com can be added to this version.